
Registration form
The registration form is the first thing a new attendee fills in, and everything they answer lands on their attendee record — the same record the profile, the directory, badges, imports and exports read. Designing it well means asking only what you need, asking each kind of attendee only what applies to them, and letting people choose the right attendee type and ticket so they arrive with the right permissions and pay the right price.
How it works
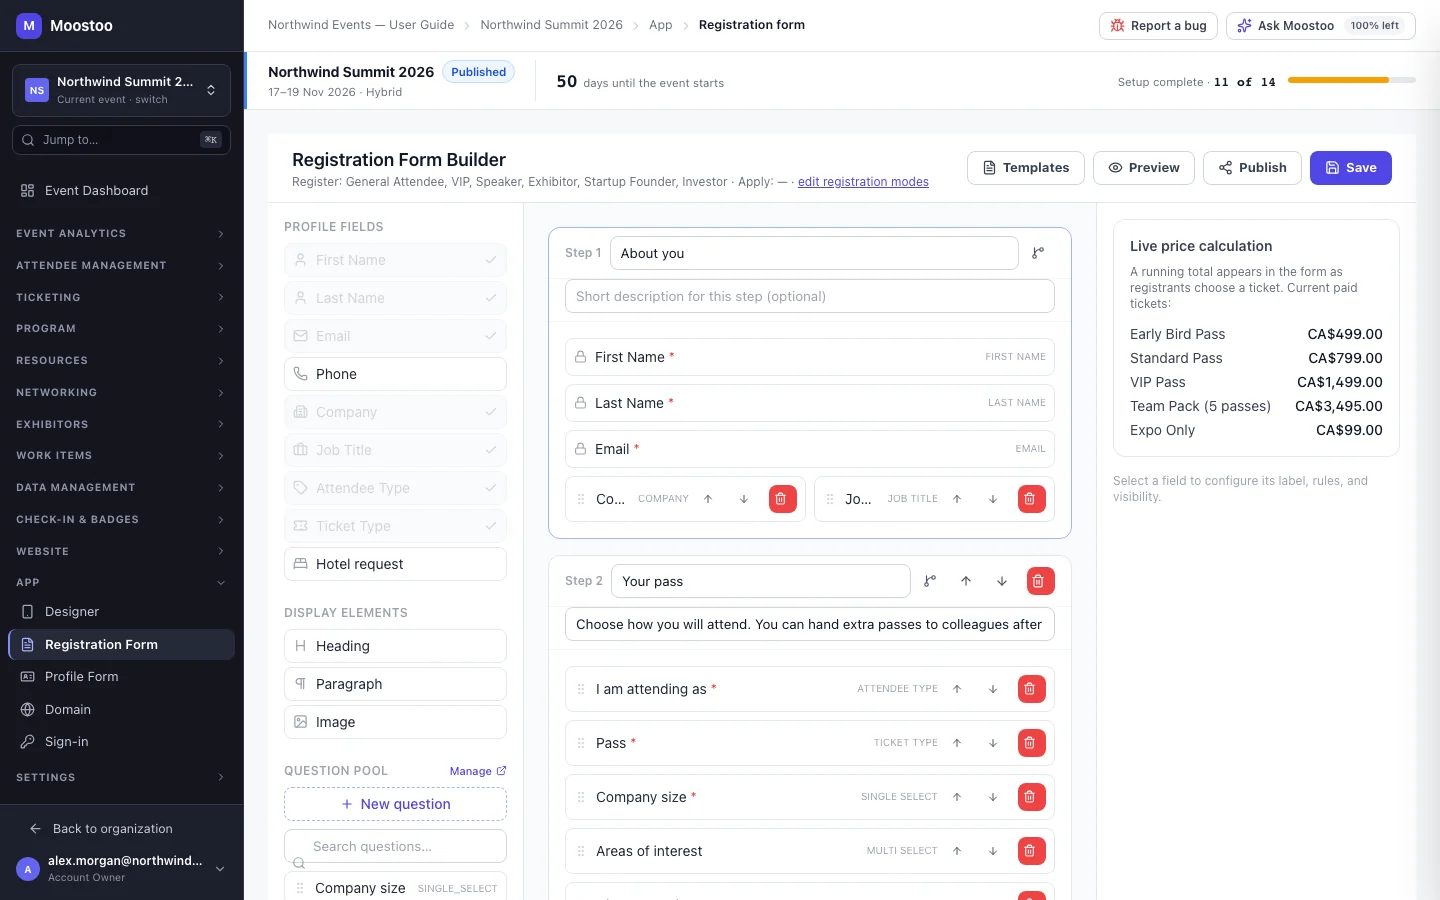
The builder has three panels: a palette on the left, the form canvas in the middle (one card per step) and, when you select a field, its Field settings on the right. Nothing reaches registrants until you click Save.
Profile Fields Built-in identity fields — First Name, Last Name, Email, Phone, Company, Job Title — plus three special variables: Attendee Type, Ticket Type and Hotel request. Each can be placed once; a placed one greys out in the palette. First Name, Last Name and Email are always on the first step and cannot be removed — in the attendee app the email address is asked first, before the form, while an embedded or shared-link form collects it in this field.
Question Pool Every other question comes from the event's Question pool. The builder does not invent ad-hoc questions: a pool question keeps its identity everywhere, so an answer given here is the same answer the profile form, the ticket details and exports show.
Display Elements A Heading, a Paragraph or an Image, for explaining a step. They collect nothing.
Steps Each card on the canvas is a step of the form. Use Add Step to split a long form, give each step a short description, reorder steps with the arrows, and set branching to jump to a different step depending on an answer.
Attendee Type and Ticket Type are two separate answers
An attendee type decides what someone may do at the event (see Attendee types); a ticket type decides what they buy (see Ticket types). They are two palette fields, and you place each wherever it belongs. Their options are always the event's own types — you never type them on the form — and by default every type is offered in the event's order, so a type you add later appears without editing the form. Types marked Admin defined are never offered to registrants: only you assign those.
- Display as lets you choose how a choice is drawn: a dropdown or radio buttons for a single answer, checkboxes or a dropdown for several. It changes presentation only, never the question.
- Applicable to limits a field to certain attendee types or ticket types, so a Speaker never sees the question you ask only exhibitors.
- Visibility rules show a field only when earlier answers match; branching on a step sends registrants to a different step.
- Hotel request lets registrants ask for a room from a hotel with a room block, while they register. It only appears when a hotel on Hotel room blocks has a block open to that person's attendee type, and never for someone applying. It is not offered in the Ticketing & Check-in Console.
- A chosen ticket becomes an order. When a registrant picks a ticket type, Moostoo creates their order and ticket, with them holding it. A paid ticket is ordered as Invoice with payment Pending — the form takes no card payment — so record the payment when it arrives.
- Register or Apply is set per attendee type, not on the form. The builder's header shows which types register directly and which apply for approval; edit registration modes takes you to the attendee types.
Step by step
Open App → Registration Form.
If the event has no ticket types yet, a banner warns that registrants cannot complete registration — create at least one in Ticket types first.
Click the step you want to work on, then click or drag fields from the palette onto it.
Place Attendee Type and Ticket Type where registrants should choose them. Select each to limit or reorder the offered types and pick a display style.
Add questions from the Question Pool. Search the pool, or create a question on the spot; it is stored in the pool and reusable elsewhere.
Select any field to set its label, placeholder, help text, width, whether it is required, which attendee or ticket types it applies to, and its visibility rules.
Click Preview to see the form exactly as a registrant will, on desktop or phone. Pick an attendee type in the preview to see what that type sees.
Click Save. Use Publish to copy the form's Direct link or its iFrame embed code for your own website.
The dialog also lists a platform subdomain address and a JavaScript widget code; the widget script is not published yet in the current release, so use the direct link or the iFrame. Templates saves the current form as a template, or loads one you saved earlier.
The preview is the real form
Preview frames the attendee app itself and feeds it your unsaved design, so what you see is what registrants get. If it keeps saying it is loading, the attendee app could not be reached; it gives up after a few seconds and says so.
What attendees see
In the attendee app
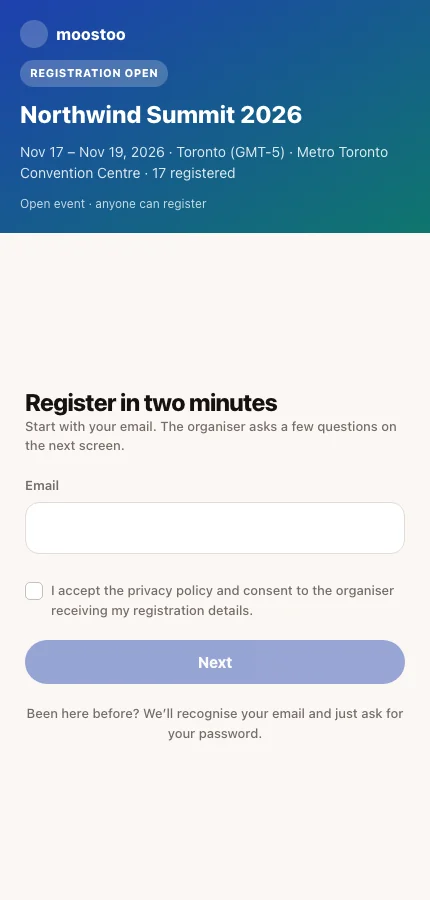
Registrants fill in your form in the attendee app, step by step, and choose their attendee type and ticket where you placed them. Required questions must be answered to continue. When the attendee type they chose is set to Apply, they submit an application instead of registering straight away.
Tips
- Keep the form short. Everything optional can be asked later on the Profile form, where attendees build their networking profile.
- Answers are stored once per question, so the same pool question on the registration form and the profile form is answered once, not twice.
- A registrant can never pick an Admin defined attendee type, even by tampering with the form — Moostoo refuses it. Assign those types yourself on the attendee directory.
- Changing the form does not change answers already given; it only changes what new registrants see.