Badge designer
A badge is the one thing every attendee carries all event. It has to say who they are at a glance, show sponsors and exhibitors who they are talking to, and carry the code every door scans. The badge designer lets you lay it out on the exact stock your printer takes, fill it from each attendee's own record, and keep several designs — one for speakers, one for VIPs, one for everyone else — with Moostoo picking the right one at the printer.
How it works
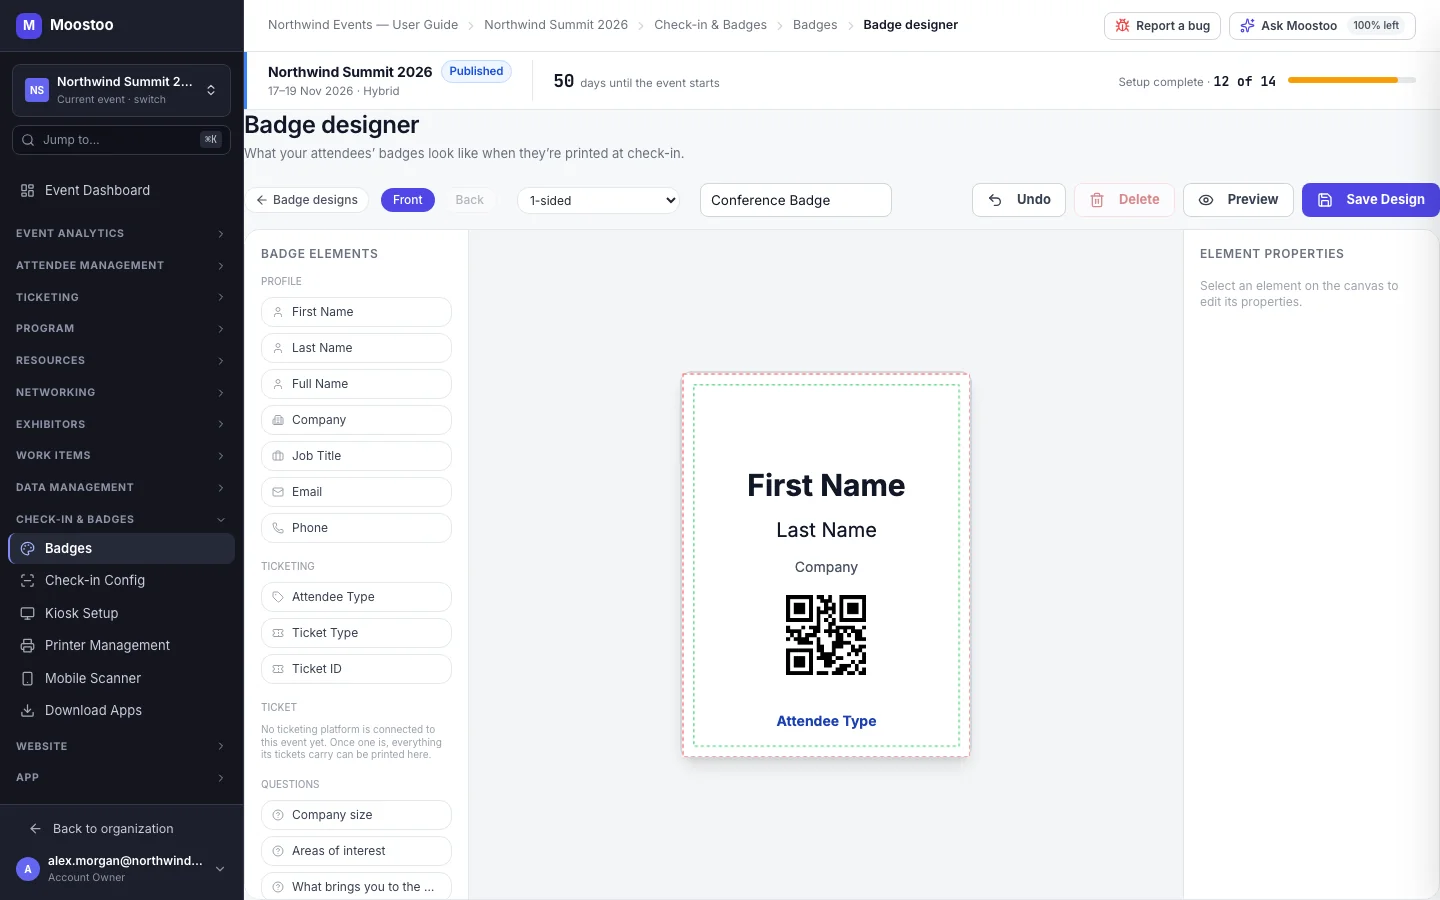
Check-in & Badges → Badges lists every badge design of the event as a table: its Name (the catch-all wears a Catch-all pill), who it Prints for (Not routed in amber when nobody), its Size, Sides, number of Elements, whether it has a QR code (None, with a warning, when it has not) and when it was Last updated. Click a row or its pencil icon to open the designer; Badge designs in the designer's toolbar brings you back. In a Ticketing & Check-in Console event these screens stay locked — Choose where your attendee data comes from first — until the event has an attendee data source.
Prints for (rules) Each design carries conditions — Print this badge when Attendee Type is VIP, Company contains Brightline, a question's answer is empty, and so on (the operators are is, is not, contains, does not contain, is empty and is not empty) — matching all or any of them. Values ignore capitals and surrounding spaces, and several values read as either. Rules can test profile, ticketing and question fields; they cannot test imported ticket fields.
Order and catch-all The designs are an ordered list, and the first one whose rules match an attendee is the badge that prints for them. One design is the catch-all: it prints for everyone no rule claimed — it is always checked last, wherever it sits in the list — so nobody reaches a printer with nothing to print. The first design you save becomes the catch-all automatically.
Not routed A design with no rules that is not the catch-all prints for nobody. It is a draft — an unfinished design can never take over the whole event.
Badge code What a QR element encodes by default, and what every scanner reads: the attendee's own QR code if you set one, otherwise their ticket ID, otherwise Moostoo's attendee ID. See Badge codes.
| Palette group | Contents |
|---|---|
| Profile | First Name, Last Name, Full Name, Company, Job Title, Email, Phone — taken from the attendee's current record. |
| Ticketing | Attendee Type, Ticket Type, Ticket ID. |
| Ticket | Every field the imported ticket carries, when a ticketing platform is connected — including fields you chose not to map. Profile shows who wears the badge; Ticket shows who the ticket was sold to. |
| Questions | Any question in the event's question pool, whether it was asked on the registration or the profile form. |
| Components | QR Code, Custom Text (with fields placed inside a sentence, such as My name is First Name) and Logo / Image. |
- Size: pick the stock under Badge Size — ID cards, event badges, thermal labels, paper sizes — or Custom… with your own width and height. The size is always one side of the badge.
- Sides: 1-sided, 2-sided (front & back) for a duplex printer, or Mirrored (fold-over): one face printed twice on a double-height sheet that folds into a badge readable from both sides.
- Badge Font applies to the whole badge; size, colour, bold/italic/underline and alignment are set per text element. Cutting Guides add a cut line, bleed and safe margins, and crop marks (once bleed is above 0) for pre-cut stock.
- Images — the logo element and the front and back backgrounds — are chosen from the Media Library and must be PNG or JPEG, the formats the badge printer can decode.
- QR contains on a QR element: Badge code (the one to use for check-in), Ticket ID, Attendee ID, or vCard (contact card) — a phone scanning a vCard offers to save the person as a contact, with the fields you tick under Include in the card, but it does not scan at check-in.
- Conditional Visibility on an element: Show for all types, Show only for selected types or Hide for selected types (by attendee type). Variants (on text elements, Add a variant) print different text for different attendees, using the same conditions as the design rules — the first matching variant wins, and anyone no variant matches gets the element's own text.
Step by step
Design a badge
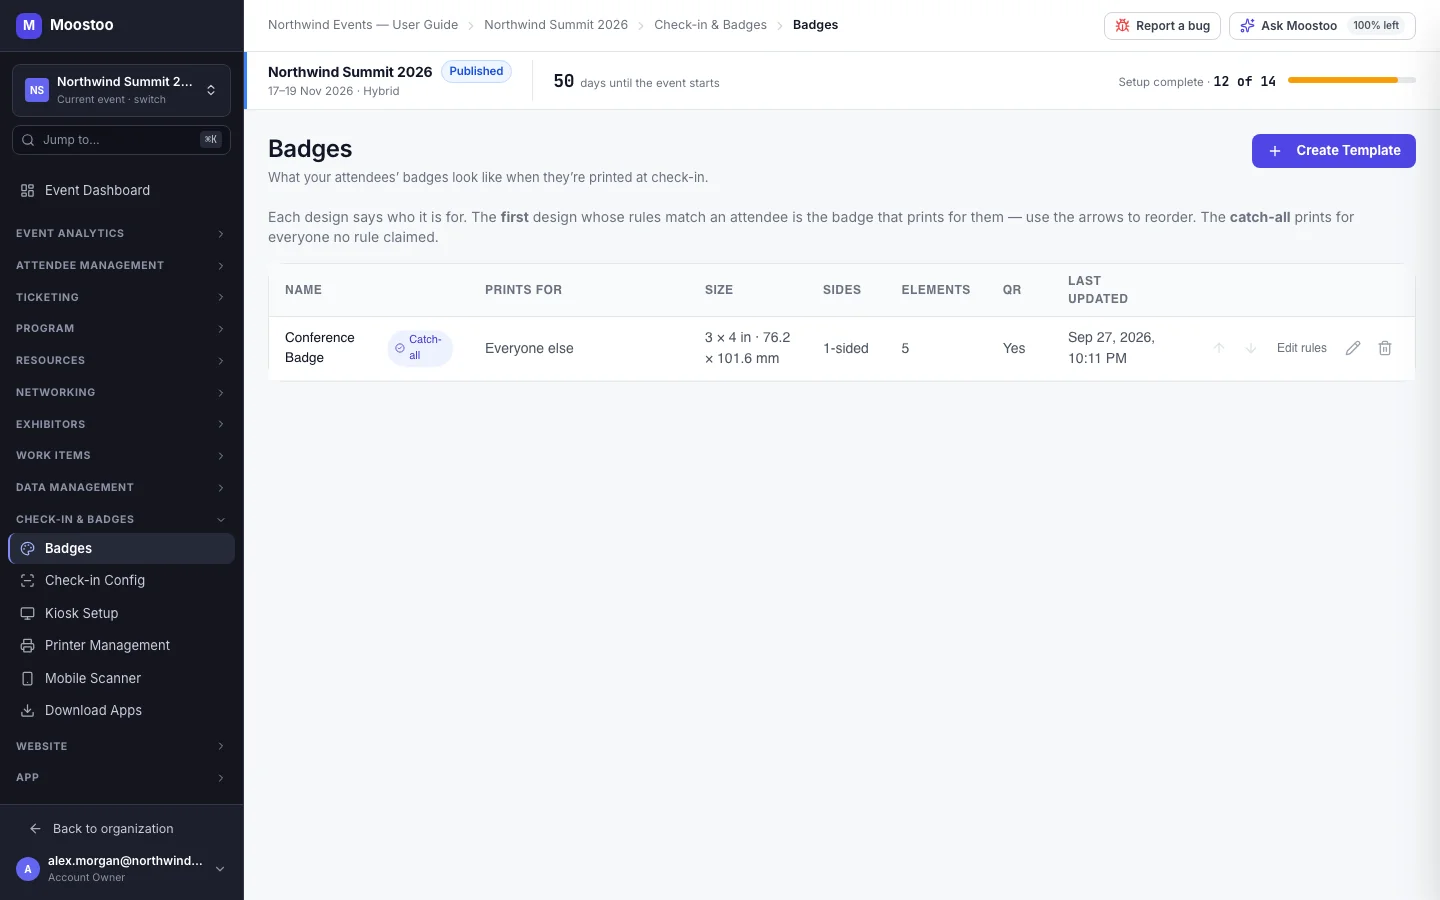
Open Check-in & Badges → Badges and click Create Template (Create Badge Template when the event has no design yet), or open an existing design.
Name the design in the toolbar — new designs start as Standard Badge.
Under Badge Size, pick the stock loaded in your printer, and choose 1-sided, 2-sided or mirrored in the toolbar.
Click fields in the left palette to place them — Full Name, Company, Attendee Type — and drag them into position.
A placed field is a text element holding the field as a chip. You can't edit what the chip prints, but you can type around it — My name is First Name — or insert more fields with Insert a variable in the properties panel.
Add a QR Code and leave QR contains on Badge code.
A design with no QR code shows a warning: those badges will not scan at the door.
Add your logo with Logo / Image, or a background under Background Image (front) / (back) with Choose image….
Click Preview to see the badge rendered with real data, then Save Design.
Preview saves the design first and renders it for the event's earliest-added attendee (or a sample attendee when there is none). Save Design stays disabled until the badge has at least one element. Undo (Ctrl/⌘+Z) and Delete are in the toolbar; leaving with unsaved changes asks whether to save.
Decide who gets which badge
On the Badges list, click Edit rules on a design (the dialog asks Who gets "…"?), click Add condition and set conditions such as Attendee Type is VIP, Speaker. Click Save Rules.
Move designs up or down with the arrows. Put the most specific designs first.
Click Set as catch-all on the design everyone else should get.
To remove a design, click its trash icon and confirm Delete Design. Deleting the catch-all warns you first — choose another catch-all so nobody is left without a badge.
What attendees see
On the badge
The printed badge is the design whose rules matched the attendee, filled with their details at the moment it prints — change a job title before printing and the new one prints. The same choice is made whether the badge is printed from a scanner, a kiosk, the attendee's page or a print hub working offline.
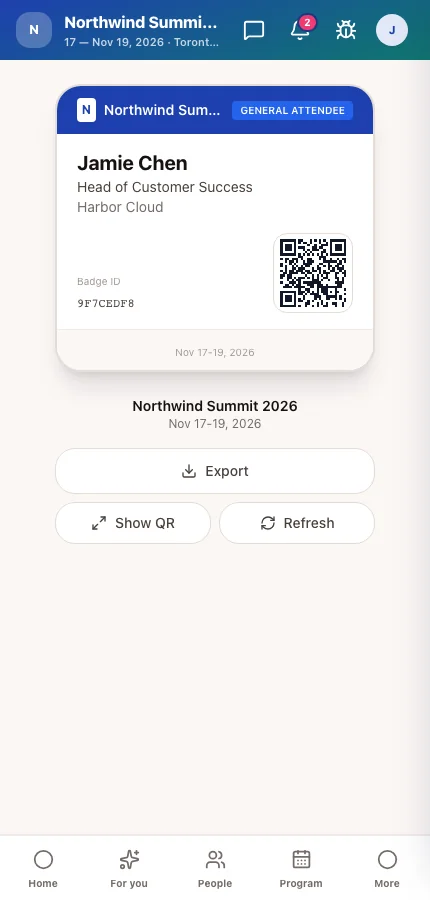
In the attendee app
Attendees carry the same scannable code on their My Badge screen, so a phone works at any door your printed badges work at.
Tips
- Always keep one catch-all. Without it, anybody your rules miss reaches the printer with nothing to print.
- Print one test badge on the real printer before the event — thermal printers and colour card printers render the same design differently (colour and italics do not survive a thermal printer).
- Keep the QR on Badge code. If you import codes from another badging system, set them as the attendee's QR code and they will print and scan unchanged.
- Editing a design on the day is safe: the next badge printed uses the saved version, and print hubs pick it up automatically.
- Badges are printed through printers and print hubs; where each badge goes is decided by print routing.